Getting Started
Lesson 1 - Creating a Layer and a Mask
What I want to do now is take you through the development of a complete script that actually does something. We'll go after the low-hanging fruit right away and start off with a few lines of code that actually create a visible result. Instant gratification - that's what I'm talkin' about. Let's get to it.
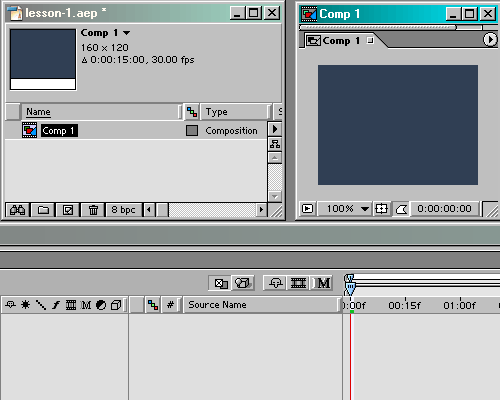
Let's start out by assuming that you have AE open and have created a comp (we'll eliminate the need to make that assumption shortly). At this point the comp should be the only thing in the project window. Your project should look something like this:

The first version of our script is simply going to create a 50x50 yellow solid at the center of the comp. Here's the code:
myComp = app.project.item(1);
mySolid = myComp.layers.addSolid([1.0,1.0,0], "my square", 50, 50, 1);
You can just copy and paste this code into a text editor and then save it with a ".jsx" extension. You may want to do this with each progressive version of the script as we go along (starting with a new comp each time) to see how it works. You want to use a simple text editor (like Notepad in Windows) instead of a word processor because you don't want any added header information - just plain text. You should save your text with the Unicode (UFT-8) option. It doesn't matter where you store your scripts (as long as you remember where) because After Effects will let you navigate to them from the "Run Script" menu. If you decide to store them in the After Effects "Scripts" folder they will show up in the "Run Scripts" menu and you can select them directly, but I like to keep my scripts in a separate folder and just navigate to them. The choice is yours.
To run the script, (don't forget to create a comp first), just go to the File menu, select "Run Script", then select "Choose File..." (assuming you haven't stored it in the "Scripts" folder). Then navigate to wherever you saved your script and open it.

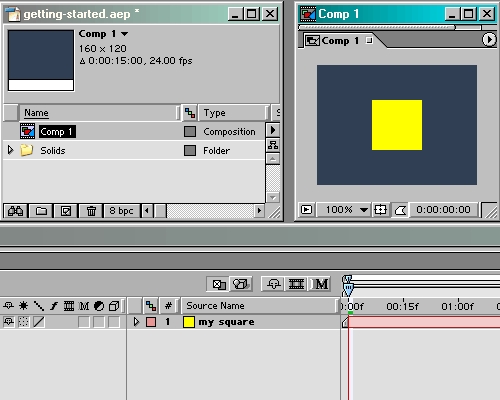
As if by magic, a yellow solid named "my square" has been added to the center of your comp. And a "Solids" folder will be added to the Project Window. Remember, with expressions there's no way to create layers and here we've done it with scripting with only two fairly simple lines of code. Let's go over the two lines in detail because there's actually quite a bit going on here.
Let's look at the first line of code in detail:
myComp = app.project.item(1);
In this line, we're creating a variable named "myComp" that we can use to access and manipulate attributes of our comp. It doesn't matter what the name of the comp is, we can now refer to it as "myComp" inside the script. What we've really done in JavaScript terms is create a comp object.
"app" is the scripting notation for the application (i.e. After Effects). "project" refers to the current project. "item(1)" refers to the first item in the project window, which as you can see above, is our comp.
So, to summarize, the first line of our script says create an object named "myComp" that references the first item in the project window (which happens to be our comp).
Let's move on to the next line. Here it is again:
mySolid = myComp.layers.addSolid([1.0,1.0,0], "my square", 50, 50, 1);
Here we're creating a variable (layer object) called "mySolid".
"myComp" you should recognize as the variable we created in the first line. "layers" is the scripting keyword that tells After Effects we're talking about myComp's collection of layers. "addSolid" is a "method" used to add a solid layer to a collection of layers.
Let's look at the parameters that we supplied to addSolid.
addSolid takes up to 6 parameters in this order:
addSolid(color,name,width,height,pixelAspect,duration)
"color" is the solid's color in [r,g,b] format, where r,g, and b are the amount of red, green, and blue expressed in the range of zero to one. In this case we supplied 100% red, 100% green, and 0% blue (which is bright yellow).
"name" is the name of the solid - "my square" in this case.
"width" is the width of the new layer (50 pixels here).
"height" is the height of the new layer (again, 50 pixels).
"pixelAspect" is the pixel aspect ratio. In our case we have set it to 1 which is square pixels. Any other number will give you rectangular pixels.
"duration" is the duration of the layer (in seconds). If you omit this parameter (which we did) the layer's duration will be the same as the comp's.
So this line says to create a new 50x50, yellow, square-pixel solid named "my square" and add it to the collection of layers contained by myComp, and create an object named "mySolid" that references the new layer.
Whew. OK - one last thing before we start adding more stuff. We really didn't have to create the variables. In fact, this abbreviated version of the script will do exactly the same thing:
app.project.item(1).layers.addSolid([1.0,1.0,0], "my square", 50, 50, 1);
So why would we do it the other way? It gets us prepared for the code we'll add shortly where we'll need to be able to reference the comp and layer objects. If we knew that we would never need to refer to these objects again, we might use the shorter version.
Adding the Mask
Now let's see how we could modify this code to create a hollow square by adding a mask to the solid. First let's look at the completed code:
myComp = app.project.item(1);
mySolid = myComp.layers.addSolid([1.0,1.0,0], "my square", 50, 50, 1);

newMask = mySolid.Masks.addProperty("Mask");
newMask.inverted = true;
myMaskShape = newMask.property("maskShape");
myShape = myMaskShape.value;
myShape.vertices = [[5,5],[5,45],[45,45],[45,5]];
myShape.closed = true;
myMaskShape.setValue(myShape);
Looking at the code above you'll notice that the first two lines (which create the square) are the same as in our previous example. The code we've previously discussed is shown in a darker color - the code we've just added is in white. That's a convention that I'll maintain throughout the site. I do that so you'll have the whole script available in one place to copy and paste into a text editor, but I want you to be able to quickly see what's been added.
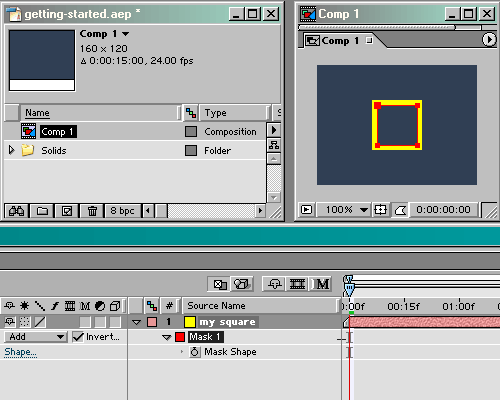
Here's what our comp looks like after running the new script (remember to start with a fresh comp):

As you can see, a mask has been added and our square has a hole punched in it.
The 7 new lines of code are all involved in creating the mask. Let's take a detailed look at this new code.
Let's examine the first new line of code we added:
newMask = mySolid.Masks.addProperty("Mask");
Here we create an object called "newMask" using the method "addProperty" to add a new mask to mySolid's collection of "Masks". Notice that we're now referencing the new layer using the object "mySolid" that we created earlier.
Here's the next line of new code:
newMask.inverted = true;
Since we want a hollow square, we need to invert the mask (otherwise we just end up with a smaller square), which we do here by setting the "inverted" attribute of our mask object "newMask" .
Let's move on to the next line:
myMaskShape = newMask.property("maskShape");
This line just creates a new object named "myMaskShape" that references the maskShape property of newMask.
Here's the next new line:
myShape = myMaskShape.value;
Here we're creating an object named "myShape" that contains the actual value of the mask shape. A shape has four attributes associated with it that define the outline of the mask. These are "closed" which is true if the mask shape is closed and false if it is open, "vertices" which is an array of pairs of numbers defining the x and y coordinates of each mask anchor point, "inTangents" which is an array of pairs of numbers defining the x and y coordinates of each of the incoming mask control points, and "outTangents" which is the same as "inTangents" except for outgoing mask control points.
Since our mask is square and doesn't need control handles, we won't need to define any inTangents or outTangents. We will, of course, need to define our mask as closed and define the vertices. This is accomplished with the next two lines of code.
myShape.vertices = [[5,5],[5,45],[45,45],[45,5]];
myShape.closed = true;
Notice that the x and y coordinates of each vertex are in the layer's coordinate space. So, for example, the vertex at [5,5] would be 5 pixels to the right of and 5 pixels below the upper left corner of our layer (the upper left corner being at [0,0] in layer coordinates). So what we've done here is define our four mask vertices at the corners of a square that is five pixels smaller on all sides than our original layer.
And finally, we use the "setValue" method to establish the static shape of our mask. If we had wanted to set a keyframe with this value, we would have used "setValueAtTime" method. But for right now, we'll just set the static value since we won't be animating the mask shape in this example. Here's the code for that:
myMaskShape.setValue(myShape);
OK - with only nine lines of code we've created a hollow square. There's no stopping us now. In the next lesson we'll expand on what we've learned so far and do some more amazing stuff.
