
Expression Speed and Frequency Control
It seems simple enough. Imagine that you have created an expression for the Rotation property, based on the global attribute time, which generates a nice smooth rotation. You have added a variable named spd to let you set the rotation speed. This is how the expression looks, set up to rotate at 360 degrees (one revolution) per second:
spd = 360;
value + time*spd
So far so good—it works as expected (see sidebar if you're wondering about the expression's use of value). Now you decide that you want to be able to manipulate the rotation speed. Your idea is to connect variable spd to a Slider Control and keyframe the slider value. This is the new version of the expression:
spd = effect("Slider Control")("Slider");
value + time*spd
You keyframe the slider to go from zero to 360, hold at 360, then go back to zero. But something goes horribly wrong. Instead of gradually speeding up, holding steady, then slowing down, the rotation starts at a fairly constant rate, slows down in the middle, and then actually backs up at the end (see sidebar movie). This is clearly not what you wanted. So what's going on here?
The bottom line is that in the world of expressions, controlling speed or frequency is not a simple task. It may seem like it should be, but it definitely is not. The good news is that there are ways to work around the problems. In this article, I'll cover the issues involved with expression speed and frequency control, then present some practical solutions to the problem.
Understanding the Problem
The first step in learning how to solve the problem is to understand why the obvious solution doesn't work. At the root of the problem is the fact that expressions have no memory. In the previous example, at each frame the expression retrieves the current value of the speed control slider and uses that value to calculate the current rotation—without taking into account previous values of the slider. The result (for each frame) is the same as if the slider had always been at its current value. So when the slider eventually returns to zero, for example, the expression calculates the total rotation as zero, which is clearly not what we want. Our expression needs to calculate cumulative rotation due to all previous values of the slider. Then, when the slider returns to zero, the expression will calculate the total degrees rotated instead of returning to zero itself. Now we have a plan, but how do we do it?
The Linear Keyframe Integrator
The key to the solution in this case involves a tiny bit of calculus. Don't panic, it's not that hard to grasp and is a very useful concept. It turns out that the missing piece to this puzzle is what's known as an integral. Using calculus, if you integrate speed over time, you get distance traveled (or in this case, total degrees rotated). In practical terms, you do this by calculating the area under the curve, and it turns out that is exactly what's needed here. What does "area under the curve" mean? The "curve" in this case is the graph of the Slider Control value versus time.
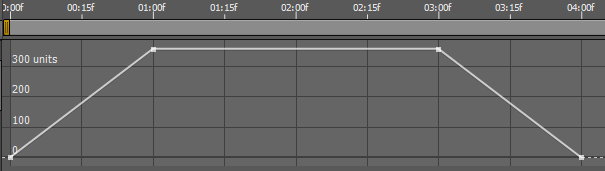
The graph of the Slider Control, which ramps up to 360 degrees per second, holds that value for two seconds, then ramps down to zero.
To calculate the area under the curve in this case, it's easiest to split the job into three segments. Each of the three segments is bounded by linear keyframes. First there's the triangular-shaped segment where the Slider Control is ramping from zero to 360 degrees per second (shaded red in the figure below). Next is the rectangular segment where the Slider Control is holding at 360 (shaded blue). Finally, there's another triangular segment where the Slider Control is ramping back down to zero (shaded green).
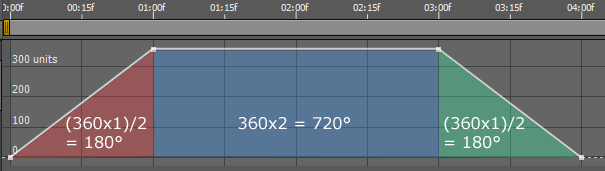
The shaded areas represent the "area under the curve" of the Slider Control, with the ramp-up, hold, and ramp-down segments set to different colors.
To get the total rotation for the entire animation, we need to calculate the area of each of the three segments and then add them together. The first and last segments have the same area, which is given by the formula for the area of a triangle: (base x height)/2, which is (1 second x 360 degrees-per-second)/2, or 180 degrees. The middle segment is a rectangle, so its area is just (width x height), which is (2 seconds x 360 degrees-pre-second), or 720 degrees. Adding these together gives 180 + 720 + 180 = 1080, for a grand total of 1080 degrees traveled.
That's all very interesting, but now what? We need an expression that calculates the area for all curve segments that have occurred in the past plus the area of the current segment, up to the current time. As an example (using the previous Slider Control animation), at two seconds, we would expect our expression to calculate the area of the first segment (180 degrees) plus half the area of the second segment (360 degrees), for a total of 540 degrees at that point. Here's an expression that will do the job:
spd = effect("Slider Control")("Slider");
n = spd.numKeys;
if (n > 0 && spd.key(1).time < time){
  accum = spd.key(1).value*(spd.key(1).time - inPoint);
  for (i = 2; i <= n; i++){
    if (spd.key(i).time > time) break;
    k1 = spd.key(i-1);
    k2 = spd.key(i);
    accum += (k1.value + k2.value)*(k2.time - k1.time)/2;
  }
  accum += (spd.value + spd.key(i-1).value)*(time - spd.key(i-1).time)/2;
}else{
  accum = spd.value*(time - inPoint);
}
value + accum
Note that this expression should work for any curve that uses linear keyframes exclusively (see the end of this section for a variation that will work for hold keyframes). (Eased keyframes require a much less efficient, frame-by-frame approach, which I will cover in the next section). At the end of the expression, variable accum contains the area under the curve, which in this case will be total degrees of rotation up to the current time. This is a fairly efficient expression because it doesn't have to reference all previous frames, just previous keyframes. The sidebar movie shows the improved result.
The expression takes advantage of the fact that you can calculate the area of any segment bounded by linear keyframes (i.e., triangular, rectangular, and trapezoidal shapes) using the same formula. This formula is simply the duration of the segment times the average value. (To get the average value, you just the add value at the first keyframe to the value at the second keyframe and divide the result by two).
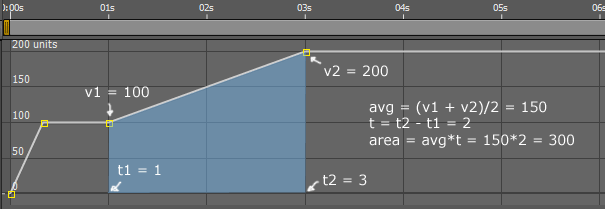
The same formula can be used to calculate the area of any trapezoidal (shown here), rectangular, or triangular segment. The area is the average value times the segment duration.
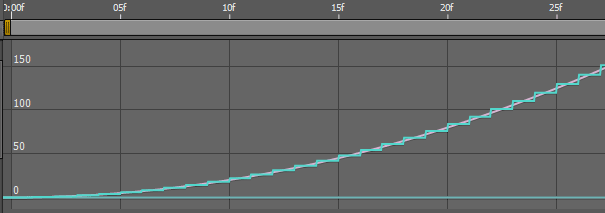
The figure below is a graph of the Slider Control (pink) and the result of the Rotation expression (cyan). Notice that the expression value keeps increasing while the Slider Control is greater than zero, and does in fact reach the desired 1080 total degrees.
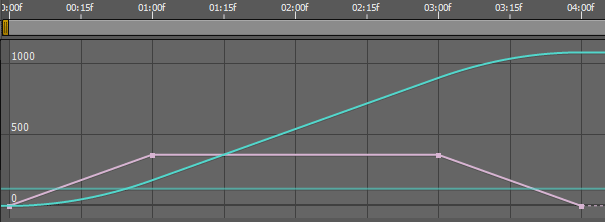
The curve (cyan) generated by integrating the Slider Control (pink). Note that the integration generates an eased curve, even with linear keyframes.
Here's a bonus. Notice in the figure above that the expression result is a smooth curve, with nice easing into and out of the ramps. Even though the linear keyframes of the Slider Control generate a sharp-edged curve, the result of the integration is smooth. That makes this expression a good choice for many speed control applications.
Hold Keyframes
There might be situations where you would rather use hold keyframes to control the speed control slider. The linear keyframe integrator expression almost works, but not quite. Here's a slight variation that will work with hold keyframes:
spd = effect("Slider Control")("Slider");
n = spd.numKeys;
if (n > 0 && spd.key(1).time < time){
  accum = spd.key(1).value*(spd.key(1).time - inPoint);
  for (i = 2; i <= n; i++){
    if (spd.key(i).time > time) break;
    k1 = spd.key(i-1);
    k2 = spd.key(i);
    v2 = spd.valueAtTime(k2.time-.001);
    accum += (k1.value + v2)*(k2.time - k1.time)/2;
  }
  accum += (spd.value + spd.key(i-1).value)*(time - spd.key(i-1).time)/2;
}else{
  accum = spd.value*(time - inPoint);
}
value + accum
In this version, for each keyframed segment, the value for the second keyframe is retrieved .001 seconds before the actual keyfame in order to get the value coming into the keyframe.
The Frame-By-Frame Method
The linear keyframe integrator is a nice tool, but you may encounter situations where it just won't work for you and you'll have to resort to the brute-force, frame-by-frame option. The expression itself is fairly straightforward and simple, but it can bring your computer to its knees in a long composition. Here's the code:
spd = effect("Slider Control")("Slider");
accum = 0;
for (i = timeToFrames(inPoint); i <= timeToFrames(time); i++){
  accum += spd.valueAtTime(framesToTime(i));
}
value + accum*thisComp.frameDuration
As with the linear keyframe integrator, this expression calculates the area under the curve of the speed control waveform. The difference is that the linear keyframe integrator calculates the area in big chunks (entire segments between keyframes) and the frame-by-frame integrator calculates the contribution of each individual frame. That means, as time progresses, the expression has to do more and more calculating at each frame (to calculate the contributions of all previous frames).
It's useful to compare how the frame-by-frame integrator performs on the same Slider Control we used for the linear keyframe integrator. The following figure shows the curve generated by the frame-by-frame integrator (cyan) superimposed on the curve generated by the linear keyframe integrator (pink). As you can see, the frame-by-frame result only changes at frame boundaries, but other than that they match up quite well. In practice, they should generate the same animation (unless you sub-frame resolution for some reason).
This shows a comparison of the numerical results of the frame-by-frame integrator (cyan) with those of the linear keyframe integrator (pink).
Controlling Frequency
In the world of expressions, it's not uncommon to create cyclic or oscillating motion by using the built-in JavaScript trigonometric functions Math.sin() and Math.cos(). They work very well at producing smooth, periodic, sinusoidal waves. It's easy to set the frequency of a wave if you remember that JavaScript trigonometric functions expect radians instead of degrees, where one complete oscillation (360 degrees), is represented by two pi radians. These trig functions generate waveforms that vary in amplitude between minus one and plus one. As an example, here's an expression that oscillates between +100 and -100 and has a cycle time of one second (or, in other words, a frequency of 1.0):
freq = 1;
amp = 100;
value + amp*Math.sin(freq*time*Math.PI*2)
Notice that the conversion to radians is easily handled by multiplying the frequency by JavaScript's built-in constant for pi, Math.PI, times two. Also note that the expression adds the calculated result to the pre-expression value, which centers the oscillation around the keyframed or static value of the property.
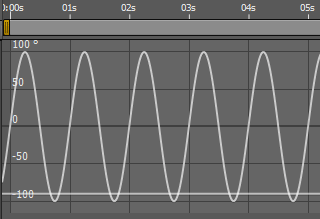
This is the smooth, periodic, sinusoidal waveform generated by Math.sin().
Now it's time for our obligatory, misguided attempt to control the frequency by tying the freq variable directly to a Slider Control. Here's the code:
freq = effect("Slider Control")("Slider");
amp = 100;
value + amp*Math.sin(freq*time*Math.PI*2)
The figure below shows the keyframed values of the Slider Control: the frequency ramps from zero to one, holds at one, ramps from one to two, holds at two, and ramps back to zero.
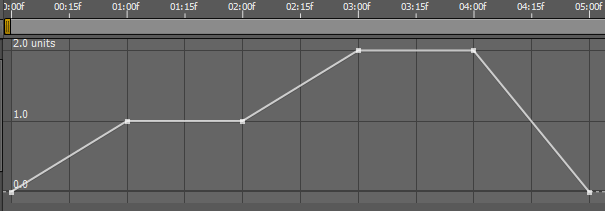
This shows the keyframed values of the Slider Control used to control frequency.
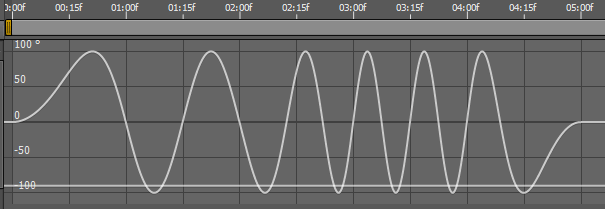
The next figure shows the horrifying result, which is not even close to what we want.
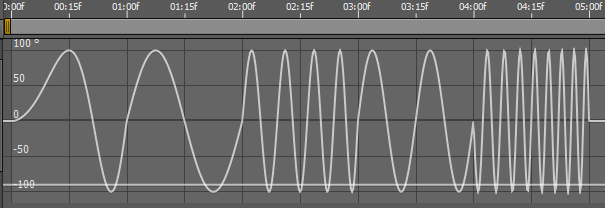
This is the chaotic result of trying to control the frequency of Math.sin() directly with a Slider Control.
Once again, the linear keyframe integrator comes to the rescue. Here's the code:
freq = effect("Slider Control")("Slider");
amp = 100;
n = freq.numKeys;
if (n > 0 && freq.key(1).time < time){
  accum = freq.key(1).value*(freq.key(1).time - inPoint);
  for (i = 2; i <= n; i++){
    if (freq.key(i).time > time) break;
    k1 = freq.key(i-1);
    k2 = freq.key(i);
    accum += (k1.value + k2.value)*(k2.time - k1.time)/2;
  }
  accum += (freq.value + freq.key(i-1).value)*(time - freq.key(i-1).time)/2;
}else{
  accum = freq.value*(time - inPoint);
}
value + amp*Math.sin(accum*Math.PI*2)
The figure below shows the improved result, which is spot on. Watch it in action in the sidebar movie.
The result is much improved by using the linear keyframe integrator.
Controlling Wiggle Speed
When trying to control the speed (frequency, actually) of the wiggle() function, you face exactly the same challenges as with the previous examples in this article. The wiggle() function has built-in frequency and amplitude parameters. You generally just set these parameters to the desired values and leave them alone. For example, you might set up a simple five-wiggles-per-second, amplitude ten wiggle for the Rotation property like this:
freq = 5;
amp = 10;
wiggle(freq,amp)
This will give you wiggle waveform as seen in the figure below.
This is the wiggle waveform generated with a static frequency parameter.
Sooner or later though, you will give in to the temptation to animate these parameters. It turns out that there are no issues at all with animating the amplitude parameter. The frequency parameter, however, is a familiar story with an unhappy ending. By now, you're probably not surprised to learn that the straightforward approach of tying the frequency parameter directly to a slider is fatally flawed:
freq = effect("Slider Control")("Slider");
amp = 10;
wiggle(freq,amp)
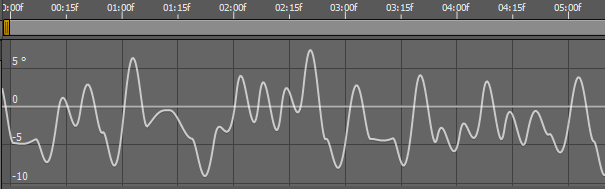
The figure below, you can see the result. The Slider Control (pink line) is keyframed to ramp from zero to five, hold at five, and then ramp back to zero. You would hope that wiggle frequency would follow, but unfortunately you get the ugly result seen below.
Tying the frequency parameter directly to a Slider Control gives the expected unacceptable result.
Your next instinct might be to apply our linear keyframe integrator expression to the frequency parameter:
freq = effect("Slider Control")("Slider");
amp = 10;
n = freq.numKeys;
if (n > 0 && freq.key(1).time < time){
  accum = freq.key(1).value*(freq.key(1).time - inPoint);
  for (i = 2; i <= n; i++){
    if (freq.key(i).time > time) break;
    k1 = freq.key(i-1);
    k2 = freq.key(i);
    accum += (k1.value + k2.value)*(k2.time - k1.time)/2;
  }
  accum += (freq.value + freq.key(i-1).value)*(time - freq.key(i-1).time)/2;
}else{
  accum = freq.value*(time - inPoint);
}
wiggle(accum,amp)
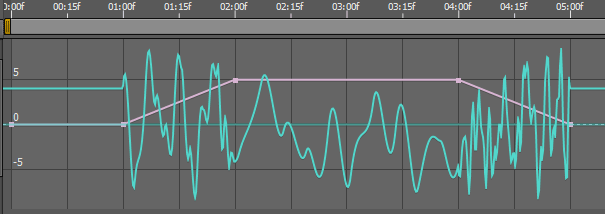
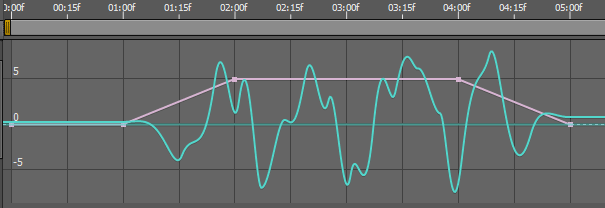
The figure below shows the unfortunate result.
Applying the linear keyframe integrator to the frequency parameter gives this terrible result.
Yikes. Not even close. In fact, it's even worse than the previous attempt. It should be pretty clear by now that we can't animate the frequency parameter and hope to succeed. All is not lost however. It turns out that we can get the result we're after by applying the integrator expression to the seldom-used, fifth parameter of wiggle(), time. This works:
freq = effect("Slider Control")("Slider");
amp = 10;
n = freq.numKeys;
if (n > 0 && freq.key(1).time < time){
  accum = freq.key(1).value*(freq.key(1).time - inPoint);
  for (i = 2; i <= n; i++){
    if (freq.key(i).time > time) break;
    k1 = freq.key(i-1);
    k2 = freq.key(i);
    accum += (k1.value + k2.value)*(k2.time - k1.time)/2;
  }
  accum += (freq.value + freq.key(i-1).value)*(time - freq.key(i-1).time)/2;
}else{
  accum = freq.value*(time - inPoint);
}
wiggle(1,amp,1,.5,accum)
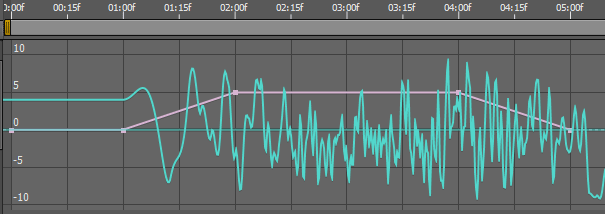
We now get a beautiful frequency ramp from zero to five wiggles per second, and back to zero. (If you're wondering about the mysterious third and fourth parameters of wiggle(), see the sidebar.)
Applying the linear keyframe integrator to the time parameter lets you animate the wiggle frequency.
The reason this works is that we're using the integrator to calculate total time elapsed based on the value of the frequency slider. We set the actual frequency parameter to one-wiggle-per-second and leave it there. We use the time parameter to move through time at a rate determined by the Slider Control.
Other Applications
It turns out that the linear keyframe integrator can be very handy for things other than speed and frequency control. For example, when you convert audio to keyframes, you get a bunch of linear keyframes. If you apply the linear keyframe integrator to this, you can use the result to animate any number of properties in time to the "beat" of the audio.
Time Remapping
You can use the linear keyframe integrator to surge a time-remapped clip ahead at each beat. Here's how the code would look:
spd = thisComp.layer("Audio Amplitude").effect("Both Channels")("Slider");
mult = .5;
n = spd.numKeys;
if (n > 0 && spd.key(1).time < time){
  accum = spd.key(1).value*(spd.key(1).time - inPoint);
  for (i = 2; i <= n; i++){
    if (spd.key(i).time > time) break;
    k1 = spd.key(i-1);
    k2 = spd.key(i);
    accum += (k1.value + k2.value)*(k2.time - k1.time)/2;
  }
  accum += (spd.value + spd.key(i-1).value)*(time - spd.key(i-1).time)/2;
}else{
  accum = spd.value*(time - inPoint);
}
value + accum*mult
Notice that variable spd has been linked to the "Both Channels" slider created by the Convert Audio to Keyframes operation. I've also introduced a new variable mult which you can use to amplify or attenuate the effect. Notice also that the expression contains the value + in the last line, which means the result of the integrator gets added to the keyframed Time Remapping value. That means that the clip always moves forward (even when there's no audio). If instead, you want the timing of the clip to be controlled entirely by the integrator, you could just modify the last line to this (which is what I did for the sidebar movie):
accum*mult
Other Properties
It doesn't take too much imagination to figure out other uses for this thing. If you bump up the value of variable mult, it makes a good expression to increase the Rotation property on each beat.
Changing the last line will give you a Scale expression that will inflate the layer to the beat (you'll probably want to bump up the value of mult for this one):
value + [accum,accum]*mult
Here's another variation of the last line that could be used as a Position expression to move a layer to the right on each beat:
value + [accum*mult,0]
You get the idea.
Be aware that when you convert audio to keyframes, you get a keyframe for each frame of the audio. That creates a lot of work for the expression as time progresses in the comp. Don't be surprised if things bog down in longer comps.
Further Exploration
In this article you've seen the pitfalls in trying to directly control an expression's speed or frequency and examined ways to get around the problems. Hopefully, the examples I've presented here will give you the tools you'll need to experiment on your own and to solve speed and frequency issues when you encounter them in your own projects. You've also seen that the linear keyframe and frame-by-frame integrators are versatile tools for solving other design issues as well.