
Physical Simulations
The Basics
Physical simulations are among some of the most interesting (and challenging) applications of expressions in After Effects. Unfortunately, they involve a little math and physics, but I'll try to make it as painless as possible. Let's start out by looking at a couple of the math functions that we'll be using a lot
It's a Good Sine
One of those math functions that we'll be using a lot is the sine wave, implemented in JavaScript as Math.sin(). A sine wave provides a nice periodic oscillating value that is very handy for many simulations. To see what it looks like, we'll use the built-in graphing capabilities of After Effects. If you apply a sine function to a Slider Control and then click the "graph overlay" icon, After Effects will display the value of the function versus time. Here's what we get when we apply the function Math.sin(time) to the Slider Control and open the graph overlay and set the scale of the graph to go from -1 to +1.:
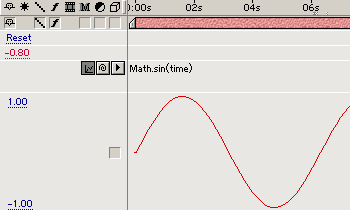
sine wave
From the graph you can see that at time 0 we get a value that starts at zero moves smoothly to +1, then back through zero to -1 and back to zero to complete the cycle. Then it repeats continuously. If you look at the graph, you can see that one complete cycle takes slightly longer than 6 seconds.
Cosine
Now let's take a look at sine's fraternal twin, cosine, implemented in JavaScript as Math.cos(). A cosine wave has the same shape as a sine wave, it's just out of phase by 90 degrees. I've included a graph of the function Math.cos(time) as an example.
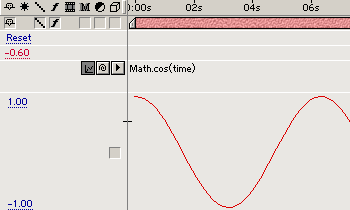
cosine wave
It starts at time 0 with a value of +1, moves through 0 to -1, back through 0, then back to +1 and it starts again. Again, you'll notice that one complete cycle takes slightly longer than 6 seconds.
Whether you use sine or cosine depends entirely on the application. Sometimes it doesn't matter, but if you need the value to start at zero you would use sine. If, however, you need the value to start at full-scale, you would use cosine.
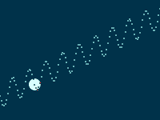
Now let's jump right in to a practical application. Say we want an oscillating motion that increases as our object moves across the screen. Here's an expression that will increase the amplitude of a sine wave oscillation linearly with time:
linearly increasing sine wave
veloc = 40; //horizontal velocity (pixels per second)
amp = 12; //sine wave amplitude (pixels)
freq = 2.4; //oscillations per second

x = time*veloc;
y = amp*time*Math.sin(freq*time*2*Math.PI) + thisComp.height/2;
[x,y]
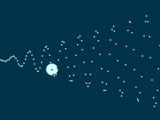
linearly increasing sine wave
To the left is a screen capture showing the motion path generated by the expression.
This code demonstrates a couple of concepts that we need to take a look at. First, the expression generates the left-to-right motion as well as the up-and-down oscillation. We could have just as easily keyframed the left-to-right motion and just used the expression for the sine wave component. To make that work, we would have to add in the layer's Position and we wouldn't need to offset the y value with half the comp height. Here's what that code would look like:
amp =12; //sine wave amplitude (pixels)
freq = 2.4; //oscillations per second

y = amp*time*Math.sin(freq*time*2*Math.PI);
position + [0,y]
Another thing I should mention here is radians. All the JavaScript trig functions expect their parameter in units called radians, not degrees. It turns out that there are 2 times pi radians in one complete cycle of an oscillation (you'll remember from geometry class that pi is the constant 3.14... - conveniently made available in JavaScript as Math.PI). So if you want to express your frequency variable in terms of oscillations per second (which is a handy way to do it and the way I did it in the examples above) you have to multiply that value times 2*pi to make it come out right. So that's why you'll see "2*Math.PI" in a lot of our sine and cosine examples.
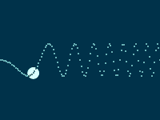
OK - what if we wanted to have our layer bounce along, increasing linearly, but only in the upward direction? That would only take a slight modification to the code from the previous example:
linearly increasing sine wave (upward only)
veloc = 40; //horizontal velocity (pixels per second)
amp =12; //sine wave amplitude (pixels)
freq = 2.4; //oscillations per second

x = time*veloc;
y = amp*time*(Math.sin(freq*time*2*Math.PI) - 1)/2 + thisComp.height/2;
[x,y]
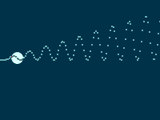
linearly increasing sine wave (upward only)
There are a couple of things to notice about this expression. The first is that we are subtracting one from the value of our Math.sin() function. So instead of a range of -1 to +1, we will now have a range of -2 to 0. Then we divide by two to give us a range of -1 to 0. Why did we do that if we want the oscillation to be upward? Because in After Effects, upward is in the negative y direction. Make sense?
OK - let's move on. Now let's look at simply having a sine wave oscillation that moves upward as it moves from left to right without increasing in amplitude. This requires only a fairly simple modification to our previous examples. Take a look at the code:
sine wave ramping upward
veloc = 40; //horizontal velocity (pixels per second)
amp =12; //sine wave amplitude (pixels)
freq = 2.4; //oscillations per second
rise = 20; //upward ramp rate (pixels per second)

x = time*veloc;
y = amp*Math.sin(freq*time*2*Math.PI) - rise*time + .8*thisComp.height;
[x,y]
sine wave ramping upward
Let's look at the changes we've made to get the new behavior. First we've added a new parameter called "rise" that defines how fast our sine wave will move upward. This value is multiplied by the time and used as a negative (upward) offset in the calculation of "y". The Math.sin() function is no longer multiplied by time so the sine wave itself does not increase in value as in the previous examples. Finally, our initial y offset has been changed to .8*thisComp.height so that movement will fit on the screen.
Let's look at how we would increase the frequency of our sine wave as our layer moves from left to right. First let's look at the code:
sine wave frequency increase
veloc = 40; //horizontal velocity (pixels per second)
amp = 16; //sine wave amplitude (pixels)
freq = 0.5; //oscillations per second

x = time*veloc;
y = amp*Math.sin(freq*time*time*2*Math.PI) + thisComp.height/2;
[x,y]
sine wave frequency increase
Let's examine what's different about this expression. The main difference is that we have "time" inside the Math.sin() function twice. This is what causes the frequency to increase with time.
Let's look at one more useful variation of sine waves before we move on to something else. What happens if you multiply two sine waves together? You get amplitude modulation. If the frequency of one wave is quite a bit smaller than the other wave, you get a sine wave at the faster frequency that increases and decreases in amplitude at the slower frequency. Here's an example:
sine wave modulation
veloc = 40; //horizontal velocity (pixels per second)
amp = 16; //sine wave amplitude (pixels)
freq1 = 0.25; //oscillations per second
freq2 = 3.0;

x = time*veloc;
wave1 = Math.sin(freq1*time*2*Math.PI);
wave2 = Math.sin(freq2*time*2*Math.PI)
y = amp*wave1*wave2 + thisComp.height/2;
[x,y]
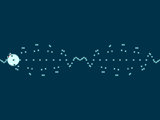
sine wave modulation
You'll notice that we now have two frequencies - "freq1" and "freq2". Our y value is now obtained by multiplying the two sine waves together.
OK - that wraps up our initial look at sine and cosine waves. They'll be back with a vengeance shortly though, when we team them up with exponential curves. It'll be fun. Really.
| next |